To start a YouTube channel, you need to have a Google account, create a YouTube channel, and customize it according to your niche and style. Read the blog to learn more!
For a thrilling and lucrative adventure, you can start a YouTube channel. This is really exciting since being a YouTube creator is an amazing chance to express yourself. You can shoot yourself with a camera and talk about different subjects that are indeed important to you.
The best part of crafting unique videos is making money. I mean it is possible to earn big bucks when you improve yourself and grow your channel. Millions of people can watch your videos and engage with them if, of course, they like the content.
Don’t forget that there are lots of people who desire to become famous YouTubers earning lots of money on the platform. Thus, you should learn “How do you make a YouTube channel?”
If you feel excited enough, we can move on with thrilling tips to make a YouTube channel successfully.
1. If You Don’t Have One, First Create a Google Account
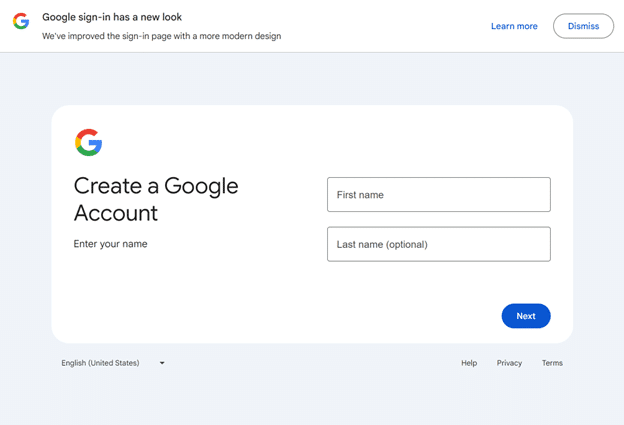
Firstly, you need to know that if you use any Google Product, you should have a Google account. This step is quite simple. You need to fill in your name and surname which is optional. Click next and fill in the basic information section. Congrats! You have a Google account, now!
Secondly, you must create a Google AdSense account to make money on YouTube. This is also a straightforward step. Yet, it is not necessary right now because you don’t start earning money as soon as you create your account. Before making money, you need to meet some YouTube eligibility criteria.
Now, you’re ready to create a channel on YouTube.
2. Create Your YouTube Channel
Follow my steps and create your channel quickly:
- Visit YouTube to sign in.
- At the top right-hand corner, tap your profile picture.
- Select Create a Channel.
- Write your channel name and add a profile picture.
Your profile picture must be:
- 800 x 800 px
- JPG, PNG, BMP, or GIF
- Round or square
5. Click Create Channel in the lower-right corner.
Voila! Now, you have a YouTube channel.
YouTube Verification with Your Phone Number
You need to verify your phone number to progress. After you complete this process, you can craft videos longer than 15 min., upload customized thumbnails, go live, and appeal content ID claims.
Here are the steps:
- Go to your homepage on YouTube.
- Dab on your profile picture.
- Find YouTube Studio on the menu and tap it.
- Select Settings from the left side.
- Tap the Channel tab from the menu that pops up.
- Select Feature Eligibility.
- See the little arrow next to Eligible in the Intermediate Features section.
- Finally, click Verify Phone Number.
Now you can create and add a banner and video watermark to your channel.
Add a Video Watermark and a Banner to Your YouTube Channel
Do you recall ever clicking on a YouTube channel and seeing a long, horizontal image sitting on top of the channel’s homepage? That’s a channel banner, and you need one to visually communicate what your channel is about. The combination of text and icons instantly tells viewers what the channel/app is about.
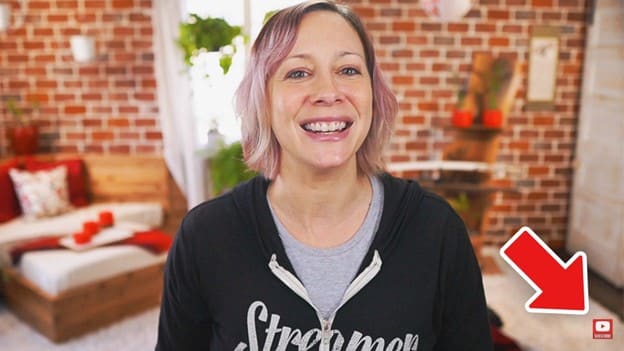
A video watermark, on the other hand, is a branded image that you can add to all the videos on your channel. It appears as a small image in the bottom right corner of your videos. It prompts viewers to subscribe to your channel when they hover over the image.
They can also subscribe to your channel directly from the video when they click on the video watermark. I wasn’t aware of this, and I’m certain many viewers don’t know that they can subscribe to your channel by clicking a watermark. So, it makes sense why some creators use a watermark that looks like a YouTube subscribe button. Here’s what that looks like:
How to Add a Video Watermark and a Banner?
You can use third-party applications to design/create a video watermark and banner for your channel. Here are some tips to implement when creating a video watermark and banner:
For video watermark;
- The file size must not exceed 1MB
- The file type must be a PNG, JPEG, BMP, or GIF (without animation)
- For the dimension, follow YouTube’s recommendation of 150 x 150 px
For banners;
- The file must not exceed 6MB in size
- The image size must be at least 2048 x 1152 px with a 16:9 aspect ratio
When you have that done, here’s how to set up a YouTube channel with a banner and video watermark:
- Click your profile icon and select YouTube Studio
- At the left navigation bar, select Customization
- Move to the Branding tab
- Go to the watermark and banner sections, then click Upload for each to add your designed watermark and banner
Easy peasy!
Give Details About Yourself While Starting Your YouTube Channel
The next thing you should consider in your journey to make a YouTube channel is an “about” section. The “about” section, as the name implies, should convey what your channel is all about. Put out a concise body of text that explains what your channel offers and how it can benefit viewers.
3. Pick a YouTube Niche
Before you start putting out videos, you must settle for a niche or channel topic. People go to YouTube for different purposes. What reasons should viewers have for watching your videos? That’s your niche and there are tons of them. Some of the most popular ones are:
- Cooking
- Education
- Gaming
- Comedy
- Music
- Business
- Finance
- Technology
- Lifestyle
- Makeup
- Sports
- Health
- Pets and animals
I recommend picking a niche within a niche. If you settle for education, what are you going to be teaching about? Within the education niche, you can pick sub-niches based on things like subjects. For example, you can choose to create educative videos on digital marketing to help content creators.
I recommend choosing a sub-specialty because it’ll help you define your target audience more effectively as well as create more specific and targeted videos.
4. Define Your Target Audience for Starting a YouTube Channel
This tip is often overlooked since having a niche gives you a vague idea of who you’re targeting with your videos. However, defining your target audience will make certain things clear. These include:
- The specifics of what your viewers need to help you make more effective videos
- Your audience’s viewing habits to help you plan your uploading time
- The likes and dislikes of your viewers to help you make more ‘viewer-centric’ videos
Granted, some of these details become clearer when you start building an audience but at this stage, you can still tell a few things about who you’re targeting.
For example, say you choose to create a channel where you provide tech-savvy advice and tutorials for freelancers. You can tell from the onset of your YouTube channel that your target audience could consist of freelancers in their 20s to early 40s who work remotely or run their own businesses. They might be interested in optimizing their digital workflows, mastering productivity tools, learning tech hacks, and staying updated on tech trends.
As you start putting out videos revolving around what you know about your target audience, you’ll begin to learn more about your audience and make better videos to engage them.
5. Have a Value Proposition for Your Audience
A value proposition is a promise you make to your viewers. It’s not just any promise, it says, “This is my brand, this is what I have to offer, and for as long as I keep putting out these kinds of videos, this is what I promise you’ll get.”
Let’s say you have a cooking channel that focuses on healthy living recipes. Your value proposition can be “Fuel your life: Wholesome recipes for vibrant living.” It communicates the promise of the cooking channel to provide wholesome recipes that contribute to vibrant living, thus fulfilling the expectations of viewers seeking content focused on eating healthy.
Having a value proposition also helps you in your content creation. If you’ve made a promise, you have to keep it. So, your value proposition guides you, so you don’t veer off course in content creation.
6. Identify Your Competitors
Which creators are making it big in your niche? Identify them.
Identifying your competitors on the platform will give you a sort of roadmap or milestones to measure your channel success against, and also get inspired.
For example, when you run out of content ideas, you can find something on your competitor’s page that you can recreate, infusing your own creativity and unique style. With time, you may even start collaborating with these competitors to grow your audience.
It’s easy to spot your competitors on YouTube. All you need is the search bar. Type in something related to your niche and explore the channels that appear in the search results.
7. Make a List of Video Ideas
As a new creator, you may not have an endless list of content to post. Actually, I don’t think any creator does. But more seasoned creators know their way around getting video ideas. When you’re just starting, however, it’s wise to create a list of video ideas because consistency matters when building your channel.
At this stage, you should have some fresh ideas. But if you don’t or say you run out, here are some ways you can get content ideas:
- Look at what others are doing in your niche
- Get inspired by the latest updates in your industry
- Hop on trending topics within your niche
- Recreate YouTube videos and make it more meaningful in your unique style
8. Do Keyword Research to Optimize Your Videos
Next tip, do keyword research to find out what terms viewers use to find videos on YouTube. For example, a newbie might type “starting a YouTube channel” to learn how to make a YouTube channel. Keyword research helps you identify those key terms.
Now you might be wondering, “What does it matter?” I’ll tell you.
After doing keyword research, you’ll have to input those terms in your video titles and descriptions. This will help you optimize your videos to appear in search results. It tells the algorithm what your video is about and who to refer them to.
Do this for each of the video ideas you listed in step 7. The more your video gets pushed up in search results, the more views you’re likely to get.
9. Set Up Your YouTube Gear
Now, it’s time to shoot your first video.
One of the scares people have when thinking of starting a YouTube channel is the cost of making a video. However, it shouldn’t be a cause for concern because making a YouTube video doesn’t cost a dime.
But if you don’t have your video equipment, you might have to spend money getting the following:
- Tripod
- External microphone
- DSLR camera for recording
- Memory cards
- Video editing software
- Lighting equipment
When you’re just starting, you can use your smartphone for recording. Eventually, you may have to get a camera. Regardless of what you use, don’t compromise on video quality. If your video is not attractive, people won’t watch it.
Lighting is also crucial for video quality. This is not a problem for creators who record in the sun. If you’re going to be indoors doing your video, then you’ll have to invest in good lighting.
10. Upload Your First Video
You’ve done all the hard work; from setting up the YouTube channel to editing your first video for the best quality. Now, you’re ready to post for the world to see. Here’s how to go about it:
- Log in to YouTube.com
- Click the camera icon at the top right corner, near your profile picture
- Click Upload Video from the menu that follows
- Click Select Files to find videos on your devices or drag and drop the video into the allocated space
Follow the next few prompts to finish the upload. Congratulations! You’ve created your YouTube channel and uploaded your first video.
FAQs
Can I Watch My Own YouTube Videos?
Yes. When you watch your own YouTube video, YouTube counts it as a view. But if you keep refreshing the page to get more views, YouTube might flag it as bot views.
How Much Does It Cost to Start a YouTube Channel?
It costs nothing to start a YouTube channel. However, you may have to spend on video creation.


