
Quickly clip parts of a YouTube video in YouTube Studio: Use the ‘Cut’ feature, sliding arrows to select the desired segment, and press ‘Cut’ to finalize. Repeat this process to trim multiple sections as needed.
Creating great YouTube videos is not easy to do, especially if you want to make it big in the content-creating world. To create a seamless original video that will draw millions of views, you need to know how to clip a YouTube video the right way.
Lucky for you, you have come to the right place! In this article, we will go over how to trim YouTube videos online step by step, how to access YouTube Studio, and everything you can do on the YouTube app. If you want to learn how to trim YouTube videos, keep reading!
Use YouTube Studio to Trim YouTube Videos
When creating your original video, it can be quite challenging trying to navigate how to use the YouTube Studio editor. Below, you will find a step-by-step tutorial on how to clip a YouTube video inside the YouTube editor. It’s easy once you get the hang of it, we promise.
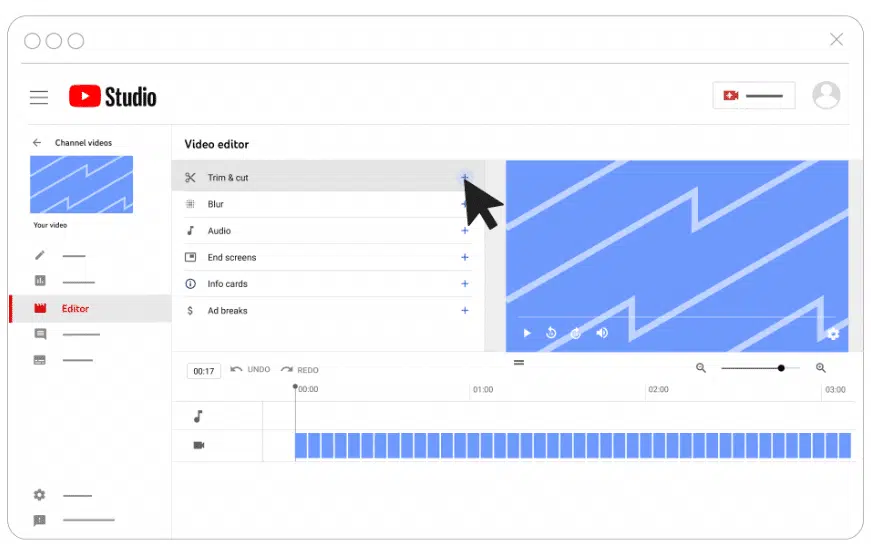
1. Find & Launch the Studio Function
So you have created your YouTube video, now what? How do you access YouTube Studio? Well, you can type on the website, or like everyone I know, just Google YouTube Studio. It will be the first link that comes up. For those of you who have used the YouTube editor, you probably know where to find it.
Don’t forget to sign in to YouTube beforehand! That way, when the YouTube Studio editor launches, it already has all your content lined up and ready to go. YouTube editor is available on both iPhone and Android, but for easier access to all the tools and more precision, we recommend using it on PC.

2. Trim Your Video
Once you are in the YouTube Studio, the next thing you want to do is select the video you want to create clips from. If you want to find the “Trim & Cut” button, click that first. It will open up the page where you can easily trim YouTube videos.
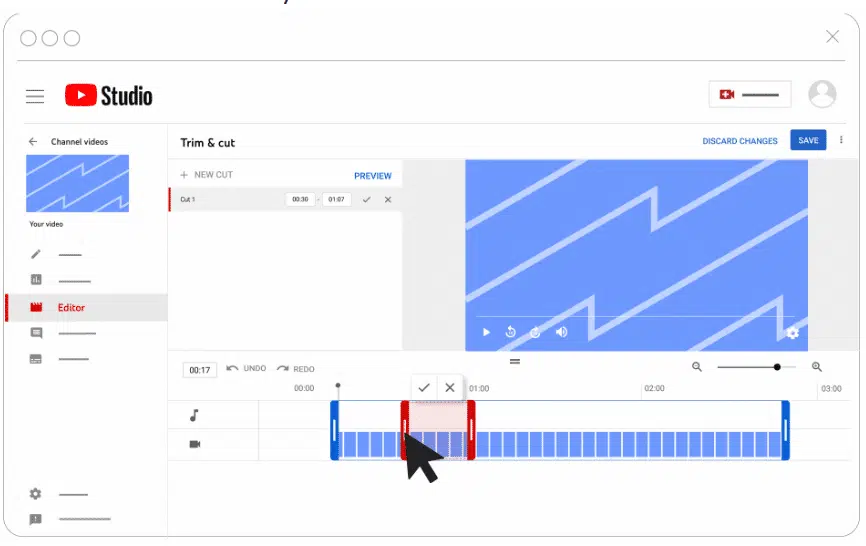
Before you start selecting the parts of the video you wish to discard, you must first choose which parts you want to keep for your YouTube clip. Drag and select all the parts of the video timeline you wish to keep, they should be enclosed in a blue bubble.
Take your time with this, because this will be what your finished YouTube videos will look like. If you want to create a good video, patience is key. Rushing will only ensure that the result is messy. This is the part of the job that is not so glamorous, which is why not everyone can make it big in the content creation world.
3. Remove Extra Video Sections
Once you have selected all the parts of your video that you wish to keep, now it’s time to move on to what parts of the video you wish to remove. You want to select the “Trim & Cut” button once more, this will give you access to the “New Cut” button. This will allow you to select what parts of the video you wish to discard.
To “create clip box”, simply press on the section below where you can see how long your video runs to bring up the clip option. Once you have selected that, and you want to select a clip, you wish to discard, you can easily drag the right side to the section of the video you want to clip. You can then use the left slider to drag the opposite end of the video to make your final selection. These selections should be enclosed in a red bubble.
Make sure to save your video progress as you go. You can do this as many times as you wish while you are editing your video. It is important to note that once your video has been uploaded, you can not clip or edit it. This will require you to make a new video. The same logic applies to live videos, as they are uploaded automatically to your timeline.
4. Post Your YouTube Video
So now that you have sat down and taken the time to create the perfect YouTube video, it is time for you to publish your final version. Make sure to use a catchy and eye-grabbing title that will draw people in. Also, share links to your video on all of your social media pages and with people you know to get the word out. Spreading the word is key to getting a ton of views on your YouTube videos and your channel.
Editing and Clipping, a Video That Is Not Your Own
If you want to use clips from someone else’s YouTube videos to put into your own YouTube videos, it is not as complicated as it seems. There are ways that you can take clips or a small portion from someone else’s YouTube video to use on your own.
1. Get Permission From Creators
We highly suggest that you get permission to do so first, as you don’t want to infringe on any copyright laws and make other content creators upset in the process. Not only could you infringe on copyright laws, but you might make a few people mad by doing so without permission.
2. Locate the Clip Button Below the YouTube Video
Depending on how your editing tools have been set up, sometimes you find a button to create YouTube clips below an existing video. If you can not locate this button, you will need to download a third-party editing app that will allow you to create YouTube clips from already uploaded YouTube videos.
3. Download the Video and Clip It
If you’re wondering how to clip a YouTube video that is not your own, you can always download it. By downloading YouTube videos, you can easily upload them into your Studio or to any other video editing program to create your own YouTube clips. You can create a clip separately within your program using any video you want.
FAQs
Can I access the editor function on my Android phone?
The editor mode is available on both Android and iPhone. You can easily edit your YouTube videos, create new clips, and publish your YouTube videos. However, beware that downloading files of this size to your phone may be quite difficult as they take up a lot of space. We recommend using a desktop PC as they have much more space available, as well as it being a little easier to control the editor mode and other functions.
Is it possible to share clips directly from the YouTube video editor?
If you are taking your clips from your videos, it is quite easy to share them directly from the video editor function. To create a clip enter the editor mode, once you have selected which video clip you want to share, you can discard the rest of your video. There will be a share clips button where you can then publish your new clip to your YouTube channel timeline. The video share clips button may look different depending on which platform you are using. The video share clip button is usually located on the top right side of the screen.


Comments